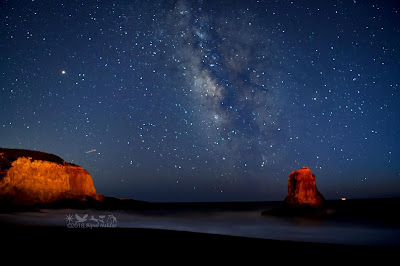
You have seen many spectacular photos of night sky and milky way. Have you ever wonder how those photographs were shot? No, those are not digital art made in image editing software. Those were shot in camera where some special techniques are involved. I'm going to give you all the tips you need to produce such image. But you would need to practice a lot before you can master them. I will first list the gadgets you would need, followed by the soft skills you need to master.
The Gadgets:- A Sturdy Tripod
- A Camera with capabilities to shoot for 15-30 secs exposure at ISO 1500-4000.
- An Wide Angle Lens ( focal length 24 mm or lower) with wider aperture (f/2.8 or lower)
- Remote shutter release or cable release - recommended but not mandatory
- A flash light - maybe a powerful one
The Time Table:
If you live in rural area where the light pollution is minimum, you may have noticed the milky way is not visible throughout the year. You can only see it at certain time in the sky. Besides the moon also interfere a lot with milky way visibility. So you need the visibility time table handy to photograph the milky way. If you can't see it in the sky, your camera can't see it either.
Here is the approximate time table for your reference:
| Month | Best Time | Moon's Phase |
| January | Not visible | N/A |
| February | Not Visible | N/A |
| March | Visible just before sunrise but not good for photography | N/A |
| April | About 4 am to Sunrise | New moon to 1 QTR |
| May | From 3 am to 6 am | New moon to 1 QTR |
| June | From 10 pm to 3 am | New moon |
| July | Right after Dark to midnight | 3 qtr to new moon |
| August | Right after Dark to 11 pm | 3 qtr to new moon |
| September | Right after Dark to 10 pm | 3 qtr to new moon |
| October | Visible just for a while after sunset for not good for photography | 3 qtr to new moon |
| November | Not Visible | N/A |
| December | Not visible | N/A |
Dark Site:The cities and it's neighborhoods are too bright to see milky way, let alone photographing it. You would need to drive off to a less light polluted areas where you can see the night sky clearly. An examples of such place would be mountain tops, remote beaches, or national parks etc. Here is a link to
Dark Site Finder that you can use to locate nearest dark area to you.
The Foreground:
A milky way shot need to be nicely composed with some interesting object in the foreground of the frame. Just the sky with full of stars would not be as interesting as one with some different object in the foreground of the frame. Be it something like a stone, a road, a tree, a house or some people. Use your creative mind to decide on your foreground object. As you practice with different types of foreground, you would find the right balance soon.
The STAR Trail Problem:
One of the main problem in night sky photography, especially for milky way is the star trail. If you keep your shutter opened for too long you would get star trail in your photo. This is because the Earth is rotating and it's relative position with respect to those stars changes in time.
One way to get ride of the star trail is to use a computerized tripod that can be programmed to compensate Earth's rotation, thus keeping the stars in the same sport in your image sensor. However, such tripods are expensive and mostly used in astrophotography. It would be an overkill to go for such tripod just to shoot milky way. You just need a regular tripod that can hold your camera lens combination steady.
To avoid star trail, your need to choose the right shutter speed based to the focal length of your lens. There are complex rules that includes aperture too but I would keep it simple. This is known as 500 rules where you divide 500 by the effective focal length of your lens. The number you would get would be the maximum shutter speed you could use.
Please note, I said "Effective Focal Length" and you need to pay attention here. The focal length you see in your lens is for the full frame cameras. The effective focal length for crop sensor cameras is 1.5 times of actual focal length. Here are 2 examples of maximum shutter speed calculation. However, below 15 secs is not recommended as the stars would not be bright enough in the frame.
- Nikon D850 Full Frame Camera
- Lens 20mm f/1.8
- Maximum Shutter Speed: (500/20 ) = 25 secs
- Nikon D500 Crop Sensor Camera
- Lens 20mm f/1.8
- Maximum Shutter Speed: (500/(20*1.5)) = 17 secs
There are many Night Sky photography gadgets that can compensate earth's rotation when properly calibrated with Polaris ( or Sigma Octantis in south pole). These gadgets e.g. 'Star Adventure pro or SkyGuider Pro' are not really required for milky way photography, rather useful for deep sky photography that would need much longer exposure beyond 30 secs. However, you can still use them to create HDR, panoramas etc.
ISO Number:
Every camera is unique in handling high ISO noise. This is something you need to experiment with your camera before you get to the right number. I would start with ISO 1600 and increase it if the stars are not bright enough. Increase the ISO or shutter speed or both till you get a right balance between star trail and noise.
OTHER Setting:
The first thing you should do in your camera is to turn off 'Long Exposure Noise Reduction'. If you don't, your camera will spend time in NR job between each exposure, equivalent to your exposure time. You don't need this in-camera noise reduction for long exposure shot. The rest of the settings like ISO, manual focus, and shutter speed have already been discussed.
The Shoot:
Ready to start shooting! You are almost there. Here are the list of things to check before you press the shutter release button.
- While it is still daylight, focus your lens to infinity or to a far away object and then turn the focus selector button in manual focus mode. Turn the camera focusing and exposure also into manual mode. Most modern lens focus ring rotates beyond infinity. So you can't just rotate the focus ring all the way and assume your focus is right. You would end up getting blurred images. Also please check before you shoot that your manual focus position is not disturbed since you fixed it last time.
- Choose your foreground object and mount your camera on the tripod. Keep the frame in balance between foreground and the night sky. Usually a rule of 3rd may be handy. However, photography is an art, no rules are written in stone.
- Choose the shutter speed and then use the remote or cable release to open the shutter or just press the shutter release button.
- Your foreground may not have enough light. So use the flash light to light paint your foreground. This is where a lot of practice could make it perfect.
- At the end of each shot, check the image in your camera LCD. If you are not satisfied, adjust the exposure and try again.
- Good Luck
Here are few example shots I took.
 |
Milky Way Over Bixby Bridge, CA-1, California
|
This shot was taken in Nikon D850, Nikon AFS 14-24 mm f/2.8 at 14mm f/2.8 and ISO 3200, exposure duration 25 secs. The foreground was illuminated by the headlights of few passing vehicles. I had several images that were washed out duo to the bright headlights of the approaching cars. This is the only one where no cars was approaching from the other side.
 |
| Milky Way - Davenport Beach, California |
This shot was taken in Nikon D850, Nikon AFS 24-70mm f/2.8 at 24 mm f/2.8 and ISO 3200, exposure duration 20 secs.This was shot in Davenport Beach, California. Here I did the light painting on both the stones.
If you find this tips useful, please leave some positive comments and share with others. You may subscribe to this blog for future tips on 'how to photograph'.
You can license a Digital Copy for your business or personal use from
Alamy


